We will go through each step so that you can ensure you get the process right. For the most part, all you’ll need to do is have the correct software on your PC and plug things in correctly. If you’re using a PS4, there will be one step you’ll need to follow before the HD60S will work. We’ll explain everything below.
Setup Console for Recording or Streaming
Firstly, if you are using a PS4, you must first turn off HDCP in the settings menu. To do this, turn on your PS4 and then navigate to the settings menu. Navigate to the bottom of the settings menu and select ‘System’. From there, untick the ‘Enable HDCP’ option. Restart your PS4. Next, visit Elgato to download the required software. You’ll need to restart your laptop after installing. Once you’ve done that, it’s time to connect your PS4 to your laptop. For this to work, you’ll need an HDMI cable, and the included USB-C to USB 3.0 cable that came with the Elgato HD60S. Your laptop must have the following specifications.
A USB 3.0 or 3.1 portAn HDMI port
Once you’ve confirmed your laptop has these elements, take your Elgato HD60S and connect it to your console via the ‘HDMI in’ port. Next, you must connect the USB-C port on the Elgato HD60S to a free USB 3.0 or 3.1 port on your laptop. Note: It must be 3.0 or higher or it will not work. At this point, you now have two choices. You can either connect the PS4 signal to your laptop via the HDMI out, or you can use that HDMI out and connect it to a TV. With the latter option, you’ll be able to view the PS4 signal on your TV as normal. If you don’t have a second display or a TV, you’ll need to view the game through the capture software. We’ll cover that next.
Record or Stream with an Elgato HD60S
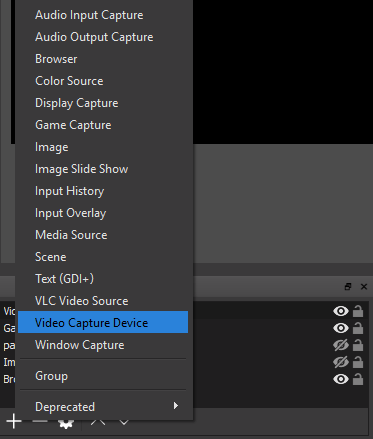
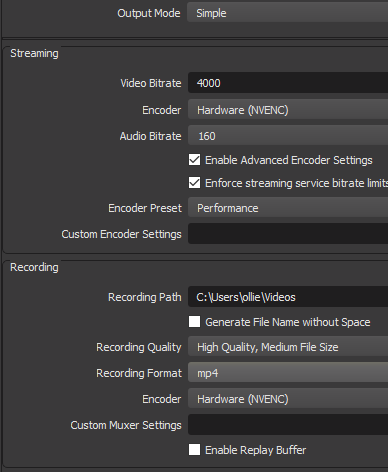
Now that you have the Elgato HD60S connected to your laptop correctly, it’s time to set up the streaming software. I’d recommend using OBS Studio. You can download it here. On OBS, click the ‘+’ under the Sources box and select ‘Video Capture Device’ option. Next, you’ll need to choose ‘Elgato Game Capture HD’ in the device dropdown box. OBS will now pick up the video from your console. Finally, for OBS to pick up the audio, you must right click the new ‘Video Capture Device’ in your sources box in OBS and click Properties. In the properties windows, scroll to the bottom and click the ‘Audio Output Mode’ drop down box. Select ‘Output desktop audio (WaveOut)’. There are now two different routes to take: If you plugged the HDMI into your laptop: you are good to go – you can start recording or streaming as normal and all audio and video can be viewed through OBS Studio. Press F11 to view it in full screen. If you plugged the HDMI into another display: You’ll need to plug your headphones into the audio port on the Elgato HD60S to hear the audio. If you’re new to OBS, there are primarily two things to consider. Firstly, if you are just recording, you can click the settings button on the bottom right of OBS and then click the Output tab. From here, make sure your recording format is set to MP4. If you’d like to stream, click Settings and use the stream tab. Some services, like Twitch, will allow you to sign straight in through OBS. Other services will require you to copy and paste the stream key from your streaming account dashboard. Once set up, all you need to do is click ‘Start Streaming’ or ‘Start Recording’ from the main OBS dashboard to begin. If you’d like, you can click to record and stream at the same time.
Summary
That brings us to the end of our guide on how to use an Elgato HD60S with a laptop. I hope that this guide has proven to be useful. If you need any help or you’re unsure about some of the steps, feel free to leave a comment and I’ll get back to you as soon as I can.


